Manage Your Disk Partitions with GParted
Resize, move, copy, and create partitions without losing data. GParted handles 20+ file systems and runs on any x86-64 computer from a bootable USB.
| Partition | File System | Size | Used | Flags |
|---|---|---|---|---|
| /dev/sda1 | ext4 | 512 MB | 340 MB | boot |
| /dev/sda2 | ext4 | 180 GB | 62 GB | |
| /dev/sda3 | ext4 | 120 GB | 45 GB | |
| /dev/sda4 | linux-swap | 8 GB | – |
What Is GParted?
A graphical partition editor for Linux, Windows, and macOS that puts full disk management in your hands — without the command line.
The partition editor that Linux users trust
GParted (GNOME Partition Editor) is a free, open-source tool for creating, resizing, moving, copying, and deleting disk partitions. It has been part of the GNOME project for over two decades, maintained primarily by Curtis Gedak. Whether you need to shrink a Windows NTFS partition to make room for a Linux install, or recover space from an old backup drive, GParted handles it through a clean GTK interface rather than forcing you into terminal commands like fdisk or parted.
How it works
GParted runs natively on Linux — install it through your distribution’s package manager (apt, dnf, pacman) and you are ready to go. For Windows and macOS machines, the GParted Live ISO boots from a USB drive or CD, giving you a minimal Debian-based environment with GParted already loaded. This means you can partition any x86-64 computer regardless of its installed operating system. The tool supports more than 20 file systems, including ext2/3/4, NTFS, FAT16/32, btrfs, exFAT, XFS, and HFS+.
Who uses it
System administrators reach for GParted when setting up multi-boot workstations or resizing server partitions without downtime. Linux newcomers use it to carve out space for a dual-boot setup alongside Windows. Data recovery specialists rely on it to rescue lost partitions. With millions of downloads on SourceForge and inclusion in most major Linux distributions, GParted has earned its reputation as the go-to graphical partitioning tool — a straightforward alternative to commercial options like EaseUS Partition Master or MiniTool Partition Wizard, without the upsell pop-ups.
Key Features
GParted gives you full control over disk partitions through a clean graphical interface. Here is what it handles out of the box.
Resize, Move and Copy Partitions
Grow or shrink partitions without reformatting the drive. GParted lets you drag partition boundaries in the visual bar, then queues operations so nothing writes to disk until you click Apply. You can also relocate partitions across unallocated space or copy them to a different disk entirely for backup and migration.
20+ File Systems
Works with ext2, ext3, ext4, NTFS, FAT16, FAT32, exFAT, btrfs, XFS, JFS, HFS+, UFS, linux-swap, and more. You can create, format, and resize partitions across all major file system types from one tool.
Bootable Live ISO
GParted Live is a small bootable ISO you can write to a USB drive or burn to a CD. Boot any x86-64 computer from it and manage partitions even when the main OS cannot be unmounted. GParted Live ships with the latest stable GParted build, Fluxbox window manager, and basic terminal tools.
GPT and MBR Partition Tables
Create and manage both modern GPT and legacy MBR (msdos) partition tables. GParted can also convert between the two formats, which is helpful when upgrading an older BIOS system to UEFI boot.
Data Rescue
Recover lost partitions after accidental deletion or table corruption. GParted can attempt data rescue operations, scanning the disk for partition signatures and rebuilding the table so your files become accessible again.
Check and Repair File Systems
Run file system checks directly from the GUI. GParted calls the appropriate backend tool (e2fsck for ext4, ntfsfix for NTFS, xfs_repair for XFS) and reports errors. Fix problems before they cascade into data loss.
Multi-Device Support
Manage internal hard drives, SSDs, USB flash drives, SD cards, and NVMe drives. GParted detects all block devices on the system and lets you switch between them from a dropdown selector at the top of the window.
Partition Flags and Labels
Set partition flags like boot, hidden, raid, lvm, and msftdata. Assign custom labels and manage UUIDs so your /etc/fstab entries stay consistent across reinstalls and hardware changes.
Partition Alignment
Align partitions to MiB boundaries (the default) or cylinder boundaries for compatibility with older systems. Proper alignment improves SSD performance and avoids read-write penalty on 4K-sector drives.
RAID Support
Recognizes hardware RAID, BIOS RAID (fakeraid via dmraid), and Linux software RAID (mdadm). View RAID arrays as single devices, resize their member partitions, and check file systems without dismantling the array.
All features are free and open source under the GPL v2+ license.
System Requirements
GParted runs as a bootable Live ISO or natively on Linux. Here is what your hardware needs to support.
| Component | Minimum | Recommended |
|---|---|---|
| Processor | x86 (i686) compatible CPU | x86-64 (amd64) processor, dual-core or better |
| RAM | 640 MB | 2 GB or more for large partition operations |
| Operating System | Any x86/x86-64 system that boots from USB or CD (GParted Live) | Linux with GTK 3.x for native install; any OS via GParted Live 1.8.0-2 |
| Boot Media | CD/DVD drive or USB port for Live version | USB 3.0 flash drive (2 GB+) for faster boot times |
| Disk Space | ~500 MB for the Live ISO image | 2 GB USB drive (minimum) to write the bootable image |
| Display | 800 x 600 resolution | 1024 x 768 or higher |
| BIOS / Firmware | Legacy BIOS with USB/CD boot support | UEFI with Secure Boot disabled (or Legacy/CSM mode enabled) |
| Additional | Keyboard and mouse | Wired internet for package-based install on Linux; not required for Live version |
GParted Live vs. native install: GParted Live is a self-contained bootable environment based on Debian. It includes GParted plus file system tools for ext4, NTFS, btrfs, FAT32, exFAT, XFS, and more. You do not need a separate Linux installation to use GParted Live.
Secure Boot note: Most machines shipped after 2012 use UEFI with Secure Boot on by default. You will need to disable Secure Boot in your BIOS/UEFI settings or enable Legacy/CSM mode before booting GParted Live.
Architecture support: GParted Live is available in three builds: amd64 (64-bit, recommended), i686 (32-bit), and i686-pae (32-bit with PAE). Pick amd64 unless you are running a very old 32-bit-only machine.
Ready to get started? Download GParted Live and boot it from a USB drive.
Download GParted
Get the latest GParted Live bootable image. Write it to a USB drive, boot from it, and manage partitions on any x86-64 computer.
GParted Live 1.8.0-2
Stable release — January 28, 2026 — 64-bit (amd64)
Download GPartedISO Image | 635.4 MB | amd64ISO Image
Bootable disc image for USB drives and CDs. Works on Windows, macOS, and Linux hardware.
Download ISO 635.4 MB — gparted-live-1.8.0-2-amd64.isoZIP Archive
Compressed archive for manual extraction. Useful if your USB tool prefers extracted files over ISOs.
Download ZIP 633.8 MB — gparted-live-1.8.0-2-amd64.zipLinux Package
Install GParted natively on your Linux distribution through the built-in package manager.
View Packages apt install gparted | dnf install gpartedVerify Your Download
SHA256: 167a114b25b0cabb8ca921413b777d2693511bc18bc1625ae310b84597b79413
SHA256 checksum for gparted-live-1.8.0-2-amd64.iso. Compare this against the downloaded file to confirm integrity.
GParted Live boots from USB or CD on any 64-bit x86 computer. Use a tool like Rufus (Windows), Etcher (macOS), or dd (Linux) to write the ISO to a USB drive. Minimum 2 GB USB drive and 640 MB RAM required. For native Linux installations, GParted is available through most distribution package managers — just run sudo apt install gparted on Debian/Ubuntu or sudo dnf install gparted on Fedora. Check the official download page for older stable releases and previous versions.
Screenshots
See GParted in action — from partition management to disk operations.

Click any screenshot to view full size
Getting Started with GParted
A hands-on walkthrough from downloading the ISO to resizing your first partition. Follow along and you will be managing disk layouts like a sysadmin in about fifteen minutes.
Downloading GParted
GParted is distributed as a bootable ISO image called GParted Live. This means you burn it to a USB drive (or CD), boot your computer from that USB, and run GParted directly – no installation on your hard drive required. Head to our download section above to grab the latest stable release.
The file you want is gparted-live-1.8.0-2-amd64.iso, which weighs in at roughly 500 MB. Most modern machines need the amd64 (64-bit) version. If you have an older 32-bit computer, look for the i686 variant instead. There is also an i686-pae build for 32-bit CPUs that support Physical Address Extension.
On a typical broadband connection, the download finishes in a couple of minutes. The ISO comes from SourceForge, so your browser may ask you to confirm the download – just accept and let it complete. SHA256 checksums are published alongside each release on the official site, so verify the hash if you want extra confidence the file arrived intact.
sudo apt install gparted on Debian/Ubuntu or sudo dnf install gparted on Fedora. The Live ISO is only needed when you need to edit the partitions your OS is currently using.
Creating a Bootable USB
GParted Live is not a standard installer. You write the ISO to a USB flash drive and boot from it. Grab a USB stick with at least 2 GB of free space – the contents will be erased during this process.
On Windows
Download Rufus (rufus.ie) or Etcher (etcher.balena.io). Open Rufus, select your USB drive under “Device,” click “SELECT” and point it to the GParted ISO. Leave the partition scheme on MBR if your computer uses legacy BIOS, or switch to GPT for UEFI machines. Click “START” and wait about two minutes for the write to finish.
On Linux
Open a terminal and write the ISO directly with dd:
Replace /dev/sdX with your actual USB device (check with lsblk first – writing to the wrong device will wipe that disk).
On macOS
Use Etcher – it works the same way as the Windows version. Or from Terminal:
Booting from USB
Restart your computer and enter the boot menu (usually F12, F2, Esc, or Del during the manufacturer logo screen). Select your USB drive from the list. GParted Live boots into a minimal Linux environment and asks a few setup questions:
- Keymap: Press Enter to accept the default US keyboard layout, or type a number to pick yours.
- Language: Type a two-letter code (like
33for English) and press Enter. - Display mode: Choose
0for the default X Window session. GParted opens automatically a few seconds later.
Initial Setup and Configuration
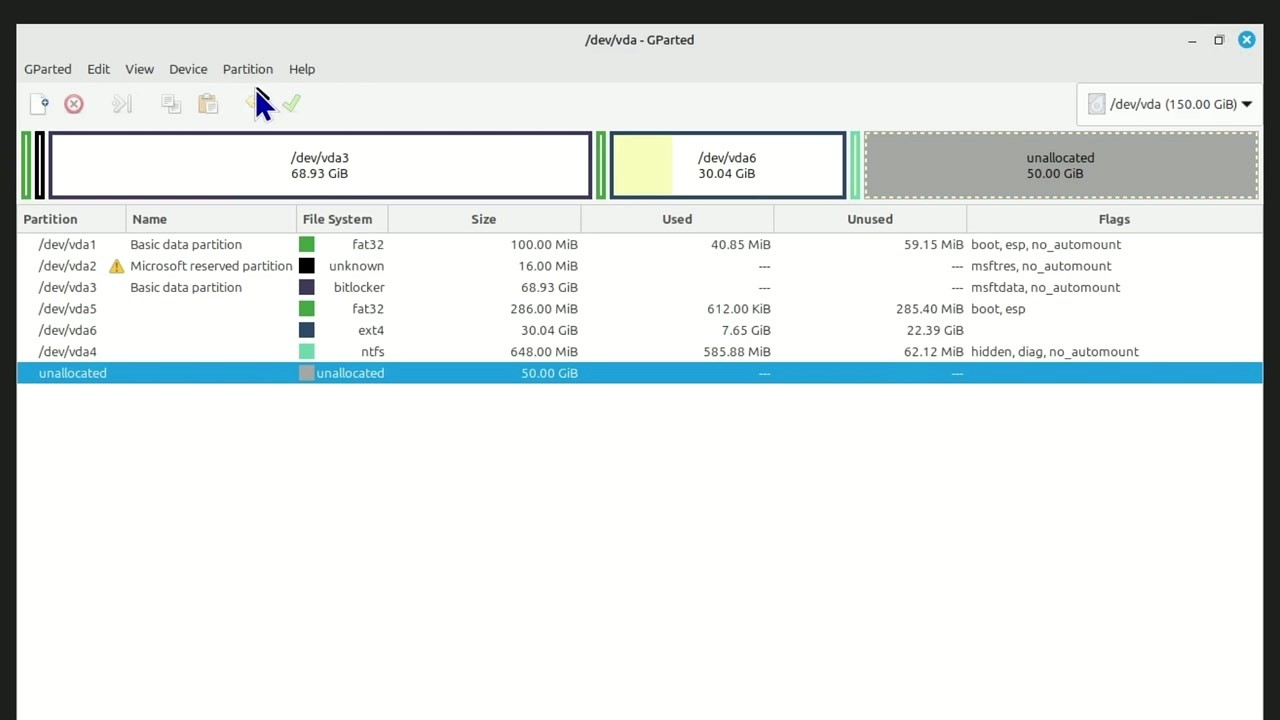
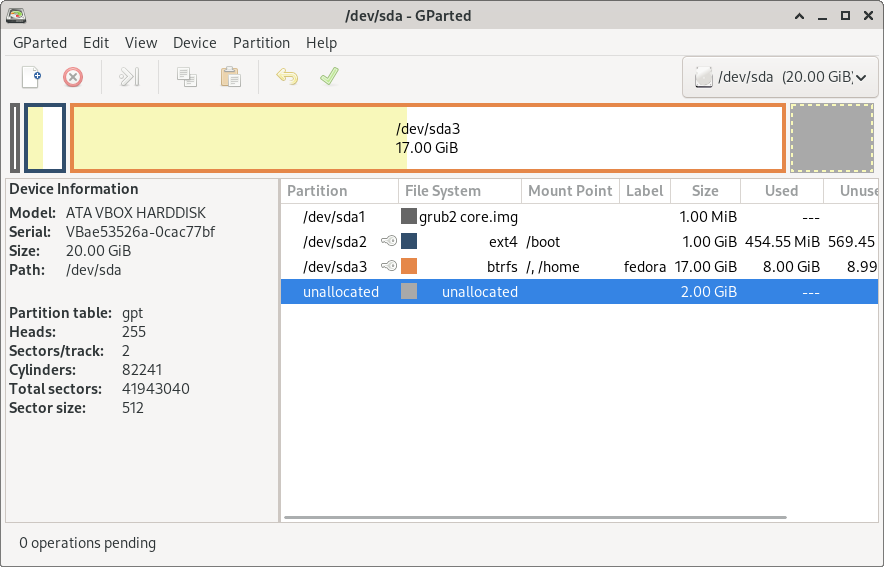
Once GParted opens, you are looking at the main window. The interface is clean: a menu bar along the top (GParted, Edit, View, Device, Partition, Help), a toolbar with action buttons, a graphical partition bar in the middle, and a detailed partition table below it.
Select the Right Disk
In the top-right corner, there is a dropdown showing your current device – something like /dev/sda (500 GB). If your machine has multiple drives (an SSD plus a hard drive, for example), click this dropdown to switch between them. Double-check the model name and capacity to make sure you picked the right one.

Enable the Information Sidebar
Go to View > Device Information to open a sidebar on the left. This shows the disk model, serial number, total capacity, partition table type (GPT or MBR), and sector size. Keeping this visible helps you confirm you are working on the correct drive at all times.
Show Pending Operations
Go to View > Pending Operations to display a panel at the bottom. Every change you make gets queued here before being applied. This is your safety net – nothing happens to your disk until you explicitly hit Apply.
Your First Partition Resize
The most common reason people reach for GParted is resizing a partition – maybe your C: drive is running out of space while another partition sits half-empty. Here is how to shrink one partition and grow another, step by step.
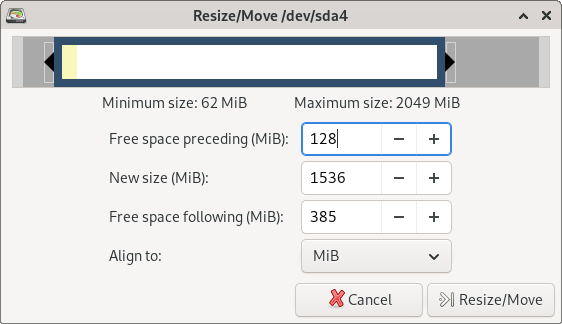
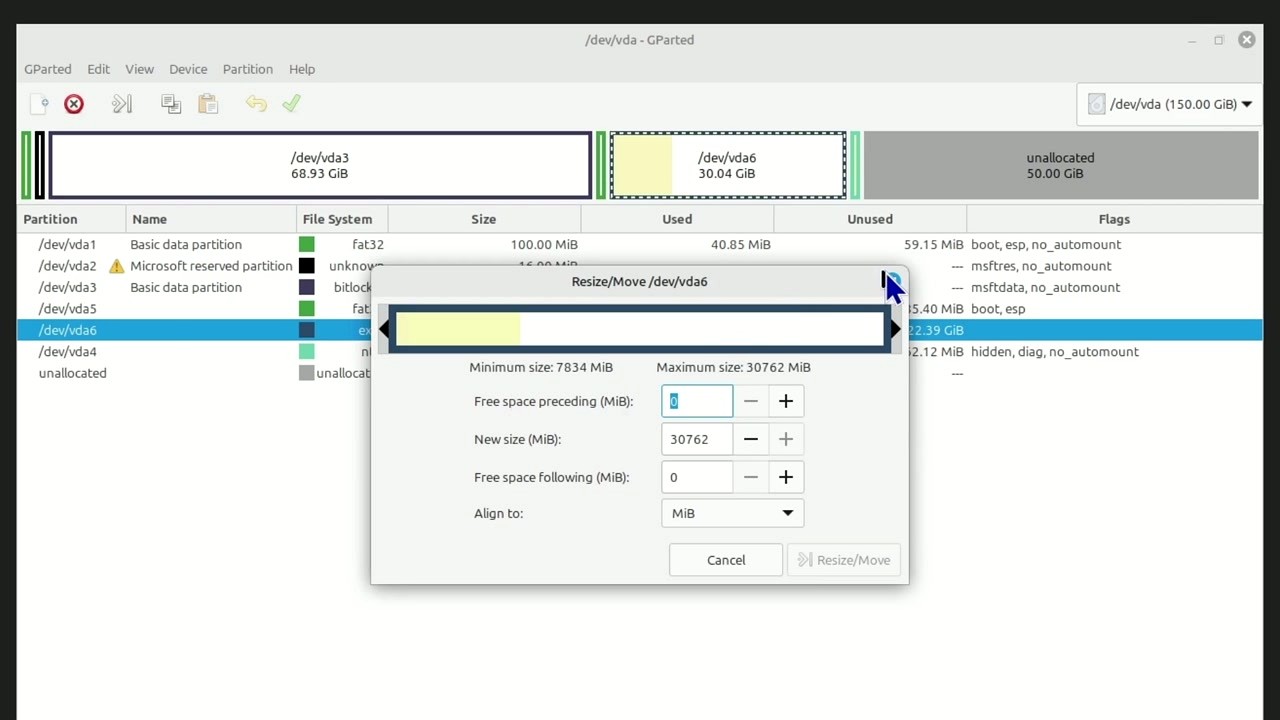
Shrink the Source Partition
- Click on the partition you want to shrink in either the graphical bar or the table below it. It highlights in blue.
- Go to Partition > Resize/Move in the menu bar (or click the resize icon in the toolbar, or right-click and choose Resize/Move).
- A dialog opens showing a visual slider and three numeric fields: Free space preceding, New size, and Free space following.
- Drag the right edge of the partition bar to the left, or type the new smaller size directly into the “New size” field. The freed space appears as “Free space following.”
- Leave Align to: MiB selected – this aligns to 1 MiB boundaries, which is correct for all modern SSDs and hard drives.
- Click Resize/Move.
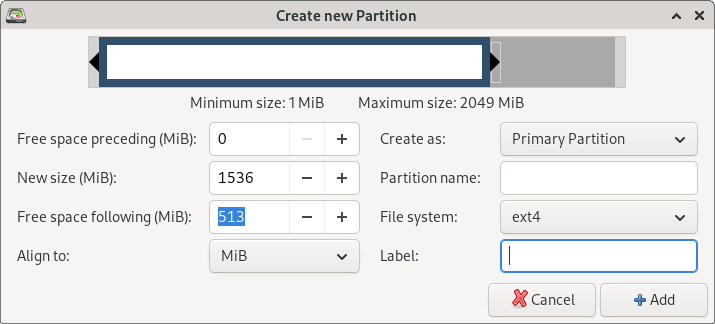
Grow the Target Partition
- Click on the partition you want to expand (it must be adjacent to the free space you just created).
- Open Partition > Resize/Move again.
- Drag the edge toward the unallocated area, or set the “New size” value to fill the available space.
- Click Resize/Move.
If the free space is not directly next to the partition you want to grow, you need to move the partition that sits between them first. Select that middle partition, go to Partition > Resize/Move, and adjust “Free space preceding” to shift it over. Moving partitions takes longer than resizing because GParted must relocate every data block.
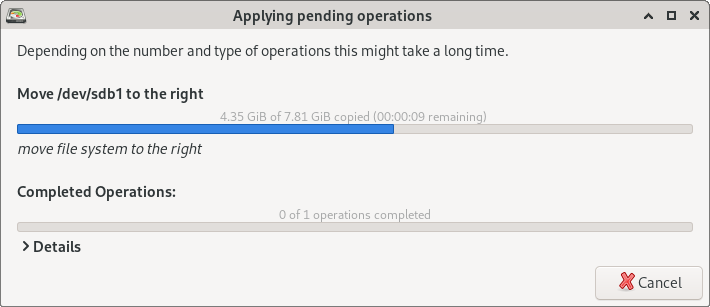
Apply All Changes
Look at the Pending Operations panel at the bottom. You should see two or three queued operations (shrink, maybe move, then grow). When you are satisfied, go to Edit > Apply All Operations (or click the green checkmark in the toolbar). A confirmation dialog warns you that this will modify your disk. Click Apply.
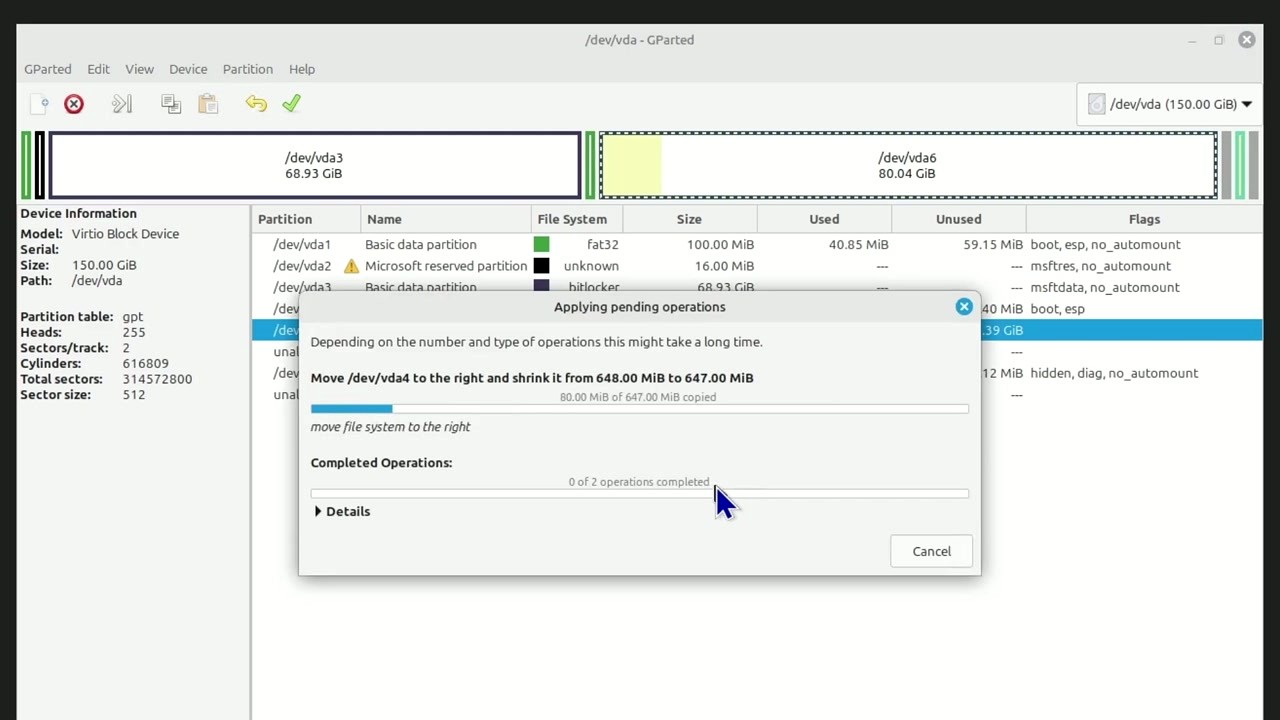
GParted runs through each operation with a progress bar. NTFS resizes typically finish within a minute. Moving large ext4 partitions can take ten to twenty minutes depending on the amount of data and drive speed. Do not interrupt this process – let it finish completely.
Keyboard Shortcuts
| Shortcut | Action |
|---|---|
| Ctrl+R | Refresh devices |
| Ctrl+Z | Undo last operation |
| Ctrl+Enter | Apply all pending operations |
| Ctrl+Q | Quit GParted |
| Delete | Delete selected partition |
Tips and Best Practices
Performance Tips
- Defragment NTFS first. If you are shrinking a Windows NTFS partition, run
chkdsk /fand then defragment the drive from within Windows before booting into GParted. This moves data away from the end of the partition and lets GParted shrink it further. - Resize before moving. If a partition needs both operations, resize it first. Moving a smaller partition is faster than moving a large one.
- Prefer the 64-bit ISO. The amd64 build supports disks larger than 2 TB and uses RAM more efficiently. Only use i686 if your hardware literally cannot boot a 64-bit kernel.
Common Mistakes to Avoid
- Wrong disk selected. Always verify the device name, model, and size in the Device Information sidebar before making changes. Editing /dev/sdb when you meant /dev/sda will ruin your day.
- Editing mounted partitions. GParted cannot resize a partition that is in use. If a partition shows a key icon, right-click and Unmount it first. For system partitions, boot from the Live USB.
- Skipping the backup. No partition tool is 100% safe. A power outage or bad sector at the wrong moment can corrupt data. Always have a backup before editing partitions.
Hidden Features Worth Knowing
- Check and Repair: Right-click a partition and select Check to run a file system consistency check (fsck for ext4, ntfsfix for NTFS). This finds and fixes minor corruption without needing a separate tool.
- Partition Labels: Right-click a partition, choose Label File System, and give it a name like “Data” or “Backup.” This makes it easier to identify partitions in file managers and mountpoints.
- Copy and Paste Partitions: You can copy an entire partition and paste it into unallocated space on the same or a different drive. This is a basic form of disk cloning.
- Create Partition Tables: Go to Device > Create Partition Table to initialize a blank drive with GPT (recommended for drives over 2 TB or UEFI systems) or MBR (for legacy BIOS).
- UUID Management: After cloning a partition, go to Partition > New UUID to generate a fresh UUID. Two partitions with the same UUID on a single system will confuse your bootloader.
Where to Get Help
The official documentation at gparted.org/display-doc.php?name=help-manual covers every feature in detail. For troubleshooting, the GParted forums on SourceForge are active and maintained by the core developers. Reddit’s r/linux4noobs and r/linuxquestions also have experienced users who answer GParted questions regularly. Unlike EaseUS Partition Master or MiniTool Partition Wizard, GParted has zero upsell pressure – every feature is available for free, always.
parted, fdisk, or testdisk directly. These tools are all bundled in the Live environment.
Ready to start managing your partitions?
Download GPartedFrequently Asked Questions
Answers to the most common questions about downloading, installing, and using GParted for disk partition management.
Is GParted safe to download and use?
Yes, GParted is safe to download and use. It has been an active open-source project under the GNOME umbrella since 2004, with its full source code publicly auditable on GitLab. The GParted Live ISO is distributed through SourceForge, which runs automated virus scans on all hosted files.
GParted version 1.8.0-2 (released January 2026) has passed scans from major antivirus engines with zero detections. The software is packaged in official repositories for Ubuntu, Fedora, Debian, Arch Linux, and most other distributions, meaning it goes through each distro’s security review process before being made available. Millions of users have downloaded GParted from SourceForge over the project’s two-decade history.
- Source code is hosted at gitlab.gnome.org/GNOME/gparted and is GPL v2+ licensed
- SourceForge provides SHA256 checksums for every ISO release so you can verify file integrity
- GParted uses well-established filesystem tools (e2fsprogs, ntfs-3g, dosfstools) rather than custom low-level code
- The project is maintained by Curtis Gedak, who has contributed to it continuously since 2006
Pro tip: Always verify the SHA256 checksum after downloading the ISO. Run sha256sum gparted-live-1.8.0-2-amd64.iso on Linux or use CertUtil on Windows and compare with the checksum listed on the SourceForge download page.
For a verified download, visit our download section which links directly to the official SourceForge release.
Is GParted free from malware and spyware?
GParted is completely free from malware, spyware, adware, and bundled software. As a GNU GPL v2+ open-source project, every line of code is publicly reviewable, and any malicious additions would be spotted immediately by the developer community.
The GParted Live ISO contains only the partition editor, a minimal Debian-based Linux environment, and supporting filesystem tools. There are no tracking mechanisms, telemetry, analytics, or phone-home features of any kind. The ISO file for version 1.8.0-2 is approximately 500 MB, which accounts for the full Debian-based live system including X11, the GTK application, and filesystem utilities like ntfs-3g and e2fsprogs.
- No installer bundleware or toolbar add-ons – the ISO boots directly into a clean desktop
- No internet connection required during use – GParted works entirely offline
- No user accounts, registration, or license activation needed
- Third-party sites sometimes repackage GParted with adware – avoid these entirely
Pro tip: A common mistake is downloading GParted from unofficial mirror sites that wrap the ISO in an ad-supported installer. Stick to SourceForge or your Linux distribution’s package manager to guarantee a clean copy.
See our features overview for details on what GParted includes out of the box.
Where is the official safe download for GParted?
The official GParted download is hosted on SourceForge at sourceforge.net/projects/gparted. The project’s homepage at gparted.org links directly to this SourceForge page for all ISO downloads.
GParted Live 1.8.0-2 (the current stable release from January 2026) is available as an ISO image in three architectures: amd64 (64-bit, recommended for most systems), i686-pae (32-bit with PAE support), and i686 (standard 32-bit). The amd64 ISO is roughly 500 MB. Linux users can also install GParted directly through their distribution’s package manager, which pulls from official repos.
- Visit our download section for direct links to the official SourceForge files
- On Ubuntu/Debian: run
sudo apt install gpartedin a terminal - On Fedora: run
sudo dnf install gparted - On Arch Linux: run
sudo pacman -S gparted
Pro tip: If you need to partition drives on a machine that already has Linux installed, skip the ISO entirely. Install GParted from your package manager and launch it with sudo gparted. The Live ISO is primarily useful when you need to work on the boot drive or on a machine running Windows or macOS.
Head to our Getting Started guide for step-by-step instructions on creating a bootable USB from the ISO.
Does GParted work on Windows 11 and Windows 10?
GParted does not install on Windows directly. Instead, you boot your computer from a GParted Live USB drive, which loads a standalone Linux environment. From there, GParted can read and modify Windows NTFS, FAT32, and exFAT partitions without any issue.
This approach actually makes GParted more powerful than Windows-native tools like Disk Management or EaseUS Partition Master, because it operates outside of Windows. That means GParted can resize, move, or copy your C: drive and other system partitions that Windows locks during normal operation. Both UEFI and Legacy BIOS boot modes are supported by GParted Live, covering all Windows 10 and Windows 11 machines.
- Windows 11 (UEFI + Secure Boot): Disable Secure Boot in BIOS settings, then boot from the GParted USB
- Windows 10 (UEFI or Legacy): Boot from USB by pressing F12, F2, or Del during startup (varies by manufacturer)
- NTFS resize and move operations are fully supported through the ntfs-3g driver
- After resizing a Windows partition, boot Windows twice to let it run a filesystem check automatically
Pro tip: Before resizing an NTFS partition, defragment it from within Windows first. Open a Command Prompt and run defrag C: /O. This moves file clusters away from the end of the partition and prevents “unable to resize” errors caused by unmovable files.
Check the system requirements section for full hardware compatibility details.
What are the minimum system requirements for GParted?
GParted requires a minimum of 640 MB RAM and an x86 processor (32-bit or 64-bit). These are the requirements for booting GParted Live from a USB drive or CD.
For the GParted Live 1.8.0-2 ISO, you need a USB flash drive with at least 2 GB of space (the ISO is approximately 500 MB, but USB creation tools often need extra room). The software supports both UEFI and Legacy BIOS boot modes. If you are installing GParted as a native Linux application instead, the requirements are even lower since the GTK application itself uses only about 20 MB of disk space and roughly 50 MB of RAM during operation.
- CPU: Any x86-64 (amd64) processor for the standard ISO. Older 32-bit CPUs can use the i686 ISO variant
- RAM: 640 MB minimum. 1 GB or more is recommended for working with large drives (2 TB+)
- USB/CD: 2 GB USB drive for creating bootable media, or a blank CD/DVD
- Disk space: None required on the target machine – GParted Live runs entirely from RAM
- Display: 800×600 minimum resolution. 1024×768 or higher is recommended
Pro tip: If your machine has less than 1 GB of RAM and you are working with drives larger than 500 GB, GParted may become sluggish during scan operations. In that case, add toram to the boot parameters so the entire live system loads into RAM, freeing the USB for better I/O performance.
See the full system requirements table for minimum vs. recommended specs.
Can GParted handle GPT and MBR partition tables?
Yes, GParted fully supports both GPT (GUID Partition Table) and MBR (Master Boot Record, also called msdos) partition table formats. You can create, modify, and convert between these formats using the Device menu.
GPT is the modern standard used by all UEFI-based systems, including every Windows 10 and Windows 11 machine. MBR is the older format, limited to 2 TB disks and a maximum of 4 primary partitions. GParted can also work with other less common partition table types, including BSD, Amiga, Sun, and Mac. The partition table type is shown in GParted’s title bar next to the device name.
- Create a new GPT or MBR table via Device > Create Partition Table
- GPT supports up to 128 partitions and drives larger than 2 TB
- MBR supports 4 primary partitions (or 3 primary + 1 extended with unlimited logical partitions)
- Converting from MBR to GPT (or vice versa) erases all data on the drive – back up first
Pro tip: If you get the error “Unable to satisfy all constraints on the partition” when working with MBR tables, it usually means there are fewer than 2 unallocated sectors before a logical partition. Delete and recreate the extended partition boundary to fix this alignment issue.
Learn more about partition management in our features section.
Is GParted completely free to download and use?
GParted is 100% free to download, use, and distribute. There is no paid version, no premium tier, no feature-locked edition, and no trial period. Every feature is available to every user at no cost.
The software is released under the GNU General Public License version 2 or later (GPL v2+), which means you can freely use it for personal, educational, commercial, and enterprise purposes. Unlike commercial alternatives such as EaseUS Partition Master (starting at $49.95/year) or MiniTool Partition Wizard (starting at $59/year), GParted will never ask you to pay for advanced features like partition recovery, disk cloning, or OS migration support.
- Free for personal, business, government, and educational use
- No registration, activation key, or user account required
- Source code is open – you can modify and redistribute it under GPL v2+ terms
- No advertisements, upsells, or nag screens of any kind
Pro tip: If you want to support GParted’s development, the project accepts donations through the GNOME Foundation. There is no obligation, but contributions help fund ongoing maintenance and new feature development.
Ready to get started? Head to the download section for the latest release.
Can I use GParted for commercial or business purposes?
Yes, GParted can be used for any commercial or business purpose without restriction. The GPL v2+ license explicitly permits commercial use, and many IT departments and managed service providers rely on GParted for day-to-day disk management tasks.
System administrators often keep a GParted Live USB in their toolkit for field work. The software handles RAID arrays (including hardware RAID, BIOS RAID, and Linux software RAID), which makes it practical for server maintenance. There is no volume licensing, no per-seat cost, and no separate “enterprise edition.” You get the full feature set whether you are a home user managing one laptop or an MSP handling hundreds of client machines.
- Deploy on unlimited machines with no license tracking
- Include in your IT toolkit or recovery media without restrictions
- Redistribute the ISO to clients or team members freely
- Modify the source code to build custom recovery images for your organization
Pro tip: For enterprise deployments, consider creating a custom GParted Live image with pre-configured settings and additional tools. The project wiki documents how to remaster the ISO with packages like testdisk, smartmontools, and custom scripts.
Review the full feature list to see what GParted offers for professional disk management.
How do I create a GParted bootable USB drive?
Creating a GParted bootable USB takes about 5 minutes. Download the GParted Live ISO from our download section, then write it to a USB drive using a free tool like Rufus (Windows), Etcher (cross-platform), or the dd command (Linux/macOS).
The GParted Live 1.8.0-2 amd64 ISO is approximately 500 MB, so any USB drive 2 GB or larger will work. The USB creation process will erase everything on the flash drive, so back up any files on it first. Once written, you can reuse the USB indefinitely for partition management on any x86-64 computer.
- Download the ISO file from our download section (gparted-live-1.8.0-2-amd64.iso)
- Windows: Open Rufus, select your USB drive, click “SELECT” to choose the ISO, leave settings at default (GPT + UEFI recommended), and click “START”
- Linux: Run
sudo dd if=gparted-live-1.8.0-2-amd64.iso of=/dev/sdX bs=4M status=progress(replace /dev/sdX with your USB device) - macOS: Run
sudo dd if=gparted-live-1.8.0-2-amd64.iso of=/dev/rdiskN bs=4mafter identifying your USB withdiskutil list - Restart your computer and press F12/F2/Del to access the boot menu, then select the USB drive
Pro tip: If you use Rufus on Windows, select “DD Image” mode instead of “ISO Image” mode if the USB fails to boot on your first attempt. Some UEFI firmware implementations are pickier about how the ISO is written.
Our Getting Started guide walks through this process in detail with screenshots and troubleshooting steps.
How do I install GParted on Ubuntu, Fedora, or Arch Linux?
Installing GParted on Linux takes one command. Open a terminal and use your distribution’s package manager to install it directly from the official repositories.
The native Linux installation is smaller and faster than booting from the Live ISO since it uses your existing desktop environment. GParted version 1.8.1 (the application, separate from the Live ISO at 1.8.0-2) is available in most distribution repositories. The installed application is about 5 MB and requires root privileges to run, since partition operations need direct disk access.
- Ubuntu/Debian/Linux Mint:
sudo apt install gparted - Fedora:
sudo dnf install gparted - Arch Linux/Manjaro:
sudo pacman -S gparted - openSUSE:
sudo zypper install gparted - Launch with
sudo gpartedfrom terminal or find “GParted” in your application menu (it will prompt for your password)
On Linux, GParted depends on parted (version 1.7.1 or newer), gtkmm (version 2.8 or newer), and various filesystem tools. If you get a dependency error during installation, run sudo apt update (or the equivalent for your distro) first to refresh your package lists. Missing filesystem tools like ntfs-3g or xfsprogs will cause some menu options to appear grayed out for those specific file systems.
Pro tip: You cannot resize or move a partition that is currently mounted. If you need to modify your root (/) or home (/home) partition, boot from GParted Live USB instead. The native install is best for working with secondary drives, USB sticks, and SD cards.
For detailed installation steps, see our Getting Started guide.
GParted Live ISO not booting – how do I fix it?
If your GParted Live USB is not booting, the most common cause is Secure Boot being enabled in your UEFI settings. GParted Live does not include a signed bootloader, so Secure Boot must be disabled before it will start.
Other frequent causes include the USB drive not being written correctly, the boot order not prioritizing USB devices, or the ISO being corrupted during download. The GParted Live boot menu offers several options including default mode, safe graphics mode (for display driver issues), and a memory test. If you see the boot menu but GParted freezes afterward, try the safe graphics option.
- Enter BIOS/UEFI settings (press F2, Del, or Esc during startup – varies by manufacturer)
- Disable Secure Boot under the Security or Boot tab
- Set USB as the first boot device in the Boot Priority order
- If using a modern UEFI system, make sure the USB was created with GPT partitioning (not MBR) in Rufus
- If the display freezes after boot, restart and select “Other modes of GParted Live” then “GParted Live (Safe graphics settings)”
- Verify the ISO checksum matches what SourceForge lists – a corrupted download is a common culprit
Pro tip: If GParted takes a very long time scanning devices at startup, you may have a floppy disk entry in your BIOS. Disable the floppy controller in BIOS settings, or launch GParted manually from the terminal with sudo gparted /dev/sda to skip the full device scan and go straight to a specific disk.
Our Getting Started guide covers USB creation and boot troubleshooting in detail.
Why are GParted menu options grayed out or disabled?
Grayed-out menu options in GParted almost always mean the partition you selected is currently mounted, or the required filesystem tool is not installed. GParted cannot modify a mounted partition because the operating system is actively using it.
This is the single most asked question in GParted support forums. When a partition is mounted, GParted displays a key icon next to it in the partition list. You must unmount the partition before resize, move, format, or delete operations become available. If you are trying to modify the partition your OS is running from (like the root / partition on a Linux desktop), you need to boot from GParted Live USB instead.
- Right-click the partition and select Unmount – if this option is also grayed out, the partition is in use by the running system
- Check for missing tools: install
ntfs-3gfor NTFS support,dosfstoolsfor FAT,btrfs-progsfor Btrfs,xfsprogsfor XFS - Close any file manager windows or terminals that have files open on the target partition
- Run
lsof +D /mount/pointto identify processes holding the partition open - For swap partitions: right-click and select Swapoff before modifying
Pro tip: The GParted Live USB never mounts your hard drive partitions automatically, which is exactly why it exists. If you consistently run into grayed-out options because you are trying to modify system partitions from within your running OS, just boot from the Live USB and all partitions will be accessible.
See the features section for the full list of supported filesystem operations.
How do I fix GParted unable to resize NTFS partition?
NTFS resize failures in GParted are usually caused by unmovable files at the end of the partition, a dirty filesystem flag, or missing the ntfs-3g package. The fix depends on which error message GParted reports in the operation details.
When Windows shuts down with “Fast Startup” enabled (the default on Windows 10 and 11), it saves a hibernation image that places unmovable data at the end of the NTFS volume. GParted cannot shrink the partition past this point. Bad sectors on the disk can also prevent resize operations, as ntfs-3g refuses to move data from damaged areas.
- Disable Fast Startup in Windows: Go to Control Panel > Power Options > Choose what the power buttons do > Change settings that are currently unavailable > Uncheck “Turn on fast startup” > Save changes
- Defragment in Windows: Open Command Prompt as Administrator and run
defrag C: /O /Vto consolidate files away from the partition boundary - Run chkdsk: In Windows, run
chkdsk C: /F /R(requires restart) to fix filesystem errors and mark bad sectors - Check for unmovable files: The Windows page file and hibernation file (hiberfil.sys) are unmovable – temporarily disable hibernation with
powercfg /h off - Verify ntfs-3g is installed: In GParted Live terminal, run
which ntfsresize– if nothing appears, runsudo apt install ntfs-3g
Pro tip: For large NTFS partitions (500 GB+), shrink in stages rather than trying to reduce the size dramatically in one operation. Shrink by 100-200 GB at a time, booting back into Windows between each resize to let it run its filesystem consistency check.
For a full walkthrough of NTFS partition management, check our Getting Started guide.
GParted is scanning devices very slowly – how to speed it up?
Slow device scanning in GParted is typically caused by the software probing every connected storage device, including network drives, card readers without media, and floppy disk controllers. You can skip the full scan by launching GParted with a specific device argument.
On startup, GParted scans each device sequentially to detect partition tables and filesystem types. If you have a USB card reader with empty slots, GParted may hang for 30-60 seconds trying to read each slot. BIOS floppy drive entries cause similar delays even on modern machines that have no physical floppy drive. Heavily fragmented NTFS or FAT filesystems also increase scan time because GParted reads filesystem metadata to calculate used and unused space.
- Launch GParted with a specific device to skip the full scan:
sudo gparted /dev/sda - Disconnect unused USB drives, card readers, and external enclosures before launching
- In BIOS settings, disable the floppy disk controller if you do not have a floppy drive
- If scanning large NTFS partitions, defragment them from within Windows first to reduce metadata complexity
Pro tip: When using GParted Live, you can switch to a virtual terminal (Ctrl+Alt+F2) and run sudo fdisk -l to quickly identify which device names correspond to which physical drives. Then launch GParted targeting only the drive you need: sudo gparted /dev/nvme0n1 for NVMe SSDs or sudo gparted /dev/sda for SATA drives.
Check the system requirements to make sure your hardware meets the recommended specs for smooth operation.
How do I update GParted to the latest version?
The update method depends on how you use GParted. If you installed it from your Linux distribution’s package manager, update through normal system updates. If you use GParted Live, download the latest ISO from our download section and create a fresh bootable USB.
GParted does not have a built-in auto-update mechanism. The application (version 1.8.1 as of January 2026) is distributed through Linux package repositories, which handle updates alongside your other system software. GParted Live ISOs (currently at version 1.8.0-2) are separate releases that include the application bundled with a Debian-based live system. New stable releases typically come out every 3-6 months.
- Ubuntu/Debian:
sudo apt update && sudo apt upgrade gparted - Fedora:
sudo dnf upgrade gparted - Arch Linux:
sudo pacman -Syu gparted - GParted Live USB: Download the newest ISO and rewrite it to your USB drive using Rufus, Etcher, or dd
Pro tip: Subscribe to the gparted-forum mailing list or check the gparted.org news page periodically to learn about new releases. Major updates often add support for new filesystem types or improve performance with large drives.
Visit our download section for the current stable release.
What is new in GParted version 1.8?
GParted 1.8.x (released in January 2026) brings updated filesystem support, improved partition alignment handling, and bug fixes for edge cases in resize and move operations. The application version is 1.8.1 while the Live ISO is at 1.8.0-2.
Recent GParted releases have focused on stability improvements rather than flashy new features. Version 1.6 added exFAT create and check support, version 1.5 improved Btrfs handling, and the 1.4 series enhanced XFS operations. The GParted Live environment is based on Debian and includes updated versions of filesystem tools like e2fsprogs, ntfs-3g, and btrfs-progs with each release, which expands what operations are available for each file system type.
- Improved error reporting when partition operations fail, with more descriptive messages
- Updated filesystem tool dependencies for better compatibility with newer drives
- Enhanced handling of drives with 4Kn (4K native) sector sizes
- Bug fixes for partition alignment calculations on GPT tables
- Updated Debian-based live system with newer kernel for improved hardware support
Pro tip: Even if a new GParted version does not list features you need, updating the Live ISO is still worthwhile because it includes a newer Linux kernel. A newer kernel means better support for recent NVMe controllers, USB 3.x hubs, and SATA/AHCI chipsets.
Grab the latest version from our download page.
GParted vs EaseUS Partition Master – which is better?
GParted is the better choice for power users, Linux users, and anyone who wants a completely free tool with no feature restrictions. EaseUS Partition Master is better suited for Windows beginners who want a GUI wizard that runs directly within Windows.
GParted supports over 20 file systems (ext4, NTFS, Btrfs, XFS, exFAT, FAT32, and more), while EaseUS is limited primarily to NTFS, FAT, and ext2/3/4. GParted runs from a bootable USB, meaning it can modify any partition including your Windows system drive without restriction. EaseUS runs inside Windows, which means system partitions often require a reboot-and-modify workflow. EaseUS’s free version restricts features like OS migration, 4K alignment, and GPT/MBR conversion to the paid Pro tier ($49.95/year). GParted has no paid tier at all.
- Price: GParted is 100% free. EaseUS free version is limited; Pro costs $49.95/year
- Filesystem support: GParted handles 20+ filesystems. EaseUS focuses on Windows filesystems
- Platform: GParted works on any x86 machine via Live USB. EaseUS requires Windows
- Ease of use: EaseUS has a more polished Windows GUI with step-by-step wizards. GParted is straightforward but assumes basic partition knowledge
- Safety: Both perform operations reliably, but GParted’s ability to work outside the running OS reduces the risk of filesystem locks and conflicts
Pro tip: Many experienced users keep both tools available. Use EaseUS (free version) for quick Windows-only tasks like extending a partition into adjacent free space, and use GParted Live for everything else, especially multi-boot setups, Linux filesystems, and system drive modifications.
See our features comparison for what GParted offers out of the box.
GParted vs MiniTool Partition Wizard – detailed comparison
GParted and MiniTool Partition Wizard target different audiences. GParted gives you unrestricted partition management at no cost through a bootable Linux environment. MiniTool focuses on Windows users who prefer an in-OS experience with added utilities like disk benchmarking and data recovery.
MiniTool Partition Wizard’s free edition restricts several features (disk cloning, OS migration, partition recovery) to the Pro version at $59/year. GParted includes all of its functionality for free. On the other hand, MiniTool integrates directly into Windows, making it more convenient for users who only work with NTFS and FAT partitions and want to avoid rebooting from a USB drive. Reddit and forum discussions from 2024-2025 consistently recommend GParted as the go-to for reliability and breadth of filesystem support.
- Price: GParted is completely free. MiniTool free is limited; Pro costs $59/year
- Interface: MiniTool has a modern Windows UI with a sidebar wizard. GParted uses a traditional GTK interface with menus and toolbars
- Extra tools: MiniTool includes disk benchmark and surface test. GParted focuses purely on partition operations
- Linux support: GParted is a native Linux app. MiniTool is Windows-only (though it offers a bootable WinPE media)
- Community trust: GParted is part of the GNOME project ecosystem. MiniTool is a proprietary Chinese software company
Pro tip: If you manage both Windows and Linux machines, GParted is the clear winner since one GParted Live USB works on any computer. MiniTool’s bootable media is WinPE-based and does not handle Linux filesystems at all.
Download GParted from our download section to try it yourself.
How do I clone a hard drive or copy partitions with GParted?
GParted can copy individual partitions between drives using its built-in Copy and Paste operations. Select a partition, click Copy (or Ctrl+C), switch to the target drive, select unallocated space, and click Paste (or Ctrl+V). Then click Apply to execute the operation.
This method copies the partition’s filesystem and all data, creating an exact block-level duplicate. The target partition will have a new UUID by default, which prevents conflicts when both drives are connected. GParted does not offer full-disk cloning (copying every partition at once with the partition table), but you can achieve the same result by creating a matching partition table on the target drive and copying each partition individually.
- Connect both the source and target drives to your computer
- Boot from GParted Live USB so neither drive is in use by the OS
- Select the source drive from the device dropdown, right-click the partition to copy, and choose Copy
- Switch to the target drive using the device dropdown
- If the target drive is blank, create a partition table first via Device > Create Partition Table (match GPT or MBR from the source)
- Right-click unallocated space on the target drive and choose Paste
- Click Apply All Operations (the green checkmark) to start the copy
Pro tip: For true full-disk cloning (partition table + all partitions), use the dd command from the GParted Live terminal: sudo dd if=/dev/sda of=/dev/sdb bs=4M status=progress. This creates a byte-for-byte clone but requires the target drive to be the same size or larger than the source.
Check out the features section for more on GParted’s partition copy capabilities.
Can GParted recover a deleted or lost partition?
GParted itself does not have a built-in partition recovery wizard, but the GParted Live environment includes access to testdisk, a powerful partition recovery tool that can scan for and restore deleted partitions.
When a partition is deleted, the data usually remains on the disk until it gets overwritten by new data. The partition table entry is removed, but the filesystem structures are still intact. Testdisk reads the raw disk surface to find these orphaned filesystem signatures and can rewrite the partition table to restore access. It supports recovery of NTFS, ext2/3/4, FAT12/16/32, exFAT, HFS+, and many other filesystem types.
- Boot from GParted Live USB
- Open a terminal (right-click desktop or use the terminal icon in the taskbar)
- Run
sudo testdiskand select “Create” to start a new log file - Select the disk where the partition was deleted
- Choose the partition table type (usually Intel for MBR or EFI GPT for GPT)
- Select “Analyse” then “Quick Search” to find deleted partitions
- If your partition appears in the list, press “Write” to restore the partition table
Pro tip: Act fast after accidental deletion. Do not write any new data to the affected drive. If testdisk’s Quick Search does not find your partition, run a “Deeper Search” which takes longer but scans more thoroughly. For file-level recovery (when the partition is gone), testdisk’s companion tool photorec can recover individual files by their signatures.
See our Getting Started guide for tips on data safety when working with partitions.
How do I resize my Linux ext4 partition with GParted?
Resizing an ext4 partition in GParted takes a few clicks. Right-click the partition, select Resize/Move, drag the slider or type the new size, click Resize/Move, then click Apply. GParted handles both growing and shrinking ext4 partitions without data loss.
Ext4 is one of the most thoroughly supported filesystems in GParted. Growing an ext4 partition is a fast operation (seconds) because it just extends the filesystem boundaries. Shrinking takes longer because GParted must first run e2fsck to verify the filesystem, then resize2fs to relocate data blocks that fall outside the new boundary. For a 200 GB partition being shrunk by 50 GB, expect the operation to take 5-15 minutes depending on drive speed and fragmentation level.
- Boot from GParted Live USB if the partition is your root (/) or home (/home) filesystem
- Make sure the target partition is unmounted (no key icon next to it)
- Right-click the ext4 partition and select Resize/Move
- Drag the right edge to shrink, or drag it outward into adjacent unallocated space to grow
- Click Resize/Move to confirm, then click the green Apply All Operations checkmark
- Wait for GParted to run e2fsck and resize2fs – do not interrupt this process
Pro tip: Growing an ext4 partition into free space to its right is simple. But if the free space is to the left, GParted needs to move the entire partition first, which takes much longer and carries slightly more risk. Whenever possible, arrange your partitions so the free space sits to the right of what you want to grow.
Our Getting Started guide covers common partition resize scenarios step by step.
Still have questions? Check the official GParted documentation at gparted.org or visit our other sections.